How I controlled my smart lights with a PS4 Controller
This is purely to demonstrate how different technologies can work together.
Yes, there are more and probably better ways to do this. Yes, there are platforms and apps that allows you to manage your home smart devices. And yes you can do all this using your Google Voice Assistant or Alexa
At the end of this page you will find links to the GitHub repo along with other resources to help you with this project.
This tutorial will only work with Xiaomi smart lights mainly because I don't have any other model. With a little bit of research you can definitely tweak it a little and make it work with your own brand of lights.
Overview and Concept
All I wanted to do is to make a Bluetooth device tell my Raspberry Pi to do something, it can be anything - like open a YouTube video or refresh a web page or tell me the weather - as long as I do it from the Bluetooth device.
So I thought if I could turn on/off the lights using a Raspberry Pi then I'll let my PlayStation controller be the remote so with a little bit of research I found all the tools and packages I needed to achieve this.
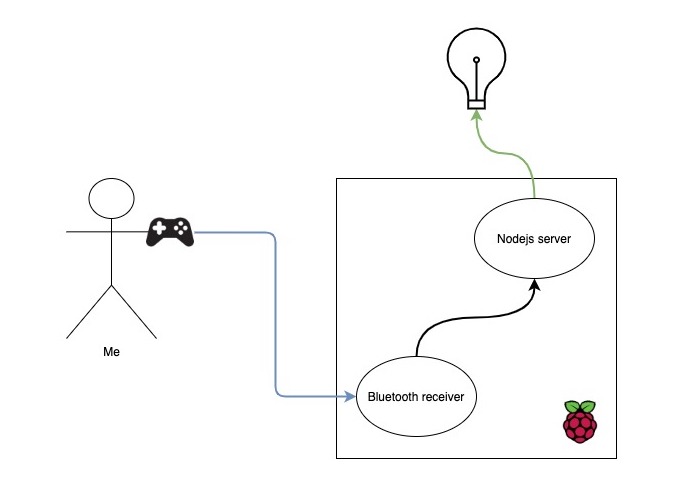
A PS4 controller sends a request to the Pi, which in turn it sends a request to a nodejs server. This server is in control of all the smart lights connected to network.
Prerequisites
PS4 Controller
Xiaomi MI smart lights
Raspberry Pi 4 (Or any Linux system with Bluetooth module)
Some JavaScript and Python knowledge
At the end of this page you will find links to GitHub repo along with other resources to help you with this project.
Steps overview
Here are the 5 main steps to make this happen, I'll talk about them in details next.
Get Xiaomi device tokens
Setup a nodejs server on Raspberry Pi
Write an API to control Xiaomi smart lights
Connect PS4 controller to Raspberry Pi via Bluetooth and Python
Write Python code to make PS4 controller interact with our API
Get Xiaomi device tokens
Xiaomi didn't make it easy to control their devices with custom clients and does not officially support controlling most of its devices from outside the Mi Home app but for us to be able to control any of the connected devices we'll need a token which is well hidden on your phone (or wherever your Mi Home app is installed).
Fortunately, there are couple of ways to extract those tokens and I found this document which explains how to obtain device tokens from various devices and systems. Please visit this link on GitHub and follow the steps depending on your device.
It is ESSENTIAL to obtain those tokens before you proceed.
Setting up Nodejs server on the Pi
To keep this post shorter I extracted this step to another post on how to setup a nodejs server on Raspberry Pi with example. You'll need to follow the steps in that post.
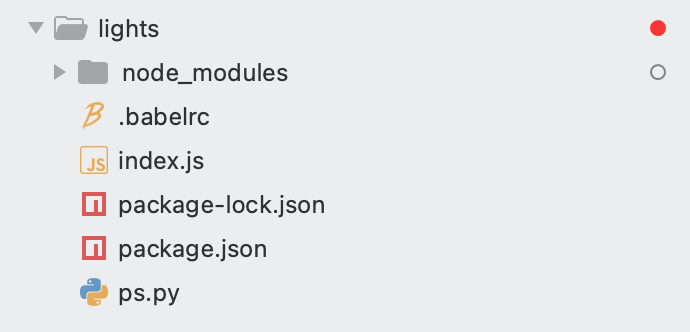
Nodejs server is required before you proceed to the next step, if you followed the steps in the link I shared you should have the following files in the project
package.json, package-lock.json,index.js, .babelrc, node_modules. Write an API to control Xiaomi smart lights
Now that you have your Node.js basic server ready you need to install this npm mijia-io package. The MiJia IO (miio) package will supply you with the API needed to interact with Mi smart devices like Yeelights, Roborock vacuums and other Mi devices.
npm i mijia-ioThis package hosted on my GitHub account is a fork from the original aholstenson/miio and the reason I'm asking you to install it from my repo is that I'll try to keep it up to date with Mi home devices including the light models in this tutorial.
After npm finishes installing the package open the main file index.js using your code editor and copy the code in the following link and paste it in index.js
// Open this link and copy the JavaScript code into your index.js
https://raw.githubusercontent.com/salamwaddah/lights/master/index.js
First, replace the value of lights array with the IP addresses and tokens you obtained in the previous steps. The code will not be effective without the correct IPs and tokens
This is just an example
// Example: lights IPs and tokens
const lights = [
  {
    // Dining room - right
    ip: '192.168.1.26',
    token: 'bbd1d8f9916517351b138b04280c1ead',
  },
  {
    // Dining room - left
    ip: '192.168.1.29',
    token: 'f3ac594d33528177cf710abf13573442',
  },
]
When all this is done, save the index.js file and go to terminal to run this command:
node_modules/.bin/babel-node index.jsThis command should start the server, your terminal should output Serving on: http://0.0.0.0:5000 and all you have to do is open your web browser and visit those links, each have a specific purpose:
Turn on: http://0.0.0.0:5000/lights/on
Turn off: http://0.0.0.0:5000/lights/off
Next color: http://0.0.0.0:5000/lights/color-next
Previous color: http://0.0.0.0:5000/lights/color-prev
(TODO) Increase brightness: http://0.0.0.0:5000/lights/brightness-up
(TODO) Decrease brightness: http://0.0.0.0:5000/lights/brightness-down
And you're done!! You can now control the lights with your web browser. Those links are called endpoints, if you visit (hit) those endpoints it will execute an action.
Now that the difficult part is done, we need instruct Python to hit those endpoints when the PS controller buttons are clicked.
Keep that tab of the terminal running and move on to the next step.
Connect PS4 controller to Raspberry Pi
For this step I will assume you have your controller paired via bluetooth to Raspberry Pi. If you don't have it connected or don't know how please follow my other guide on how to connect a PS4 controller to Raspberry Pi via bluetooth
Next, verify you have Python 3 installed by typing in the command in the terminal python3 --version. Raspberry Pi should have it by default but verify it just in case.
Install pyPS4Controller Python module. This open source module will detect input signals from PlayStation 4 Controller and give you events. We need those events.
Use pip3 installer that comes with Python3 for best compatibility.
# In the project root install pyPS4Controller package using pip3
sudo pip3 install pyPS4Controller
Using your code editor create a new Python file in the lights project root which we agreed is located in /home/pi/Projects/lights. Call this file ps.py and paste in this Python snippet.
from pyPS4Controller.controller import Controller


class MyController(Controller):

    def __init__(self, **kwargs):
        Controller.__init__(self, **kwargs)


controller = MyController(interface="/dev/input/js0", connecting_using_ds4drv=False)
controller.listen()
The previous code is just a boilerplate for the pyPS4Controller module. It does all the MAGIC needed to listen to your input on the controller and convert it to events.
Run the script by going to your terminal and type in:
python3 ps.pyThe script is now running. Click any button on your controller and you should see an output on the terminal. That means we're done connecting the controller and we can successfully receive events.
Once you verify it's connected you can stop the Python code, hit CTRL+C / command+C on your keyboard to stop the Python script.
Make PS4 controller interact with our API
Time to connect the dots. But before we do that let's have a look at our project files so far, it should look like this
Now we need to make our controller send request to the server. By listening to the controller events of certain buttons when they are pressed we have to take an action. Those actions will be sending a request to nodejs.
To be able to send requests in Python we need the requests module which can be installed with this command:
sudo pip3 install requestsThen open ps.py file with the code editor and add the following code and save the file.
# Replace the code in your ps.py with the following code
from pyPS4Controller.controller import Controller
import requests
class MyController(Controller):
def __init__(self, **kwargs):
Controller.__init__(self, **kwargs)
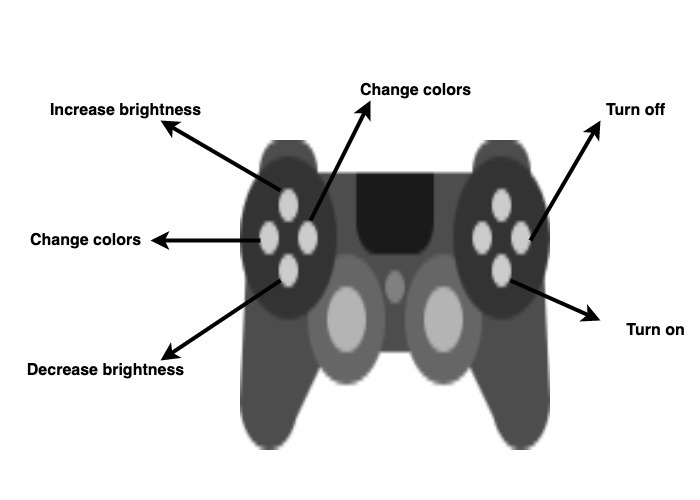
def on_square_press(self):
requests.get('http://0.0.0.0:5000/lights/on')
def on_x_press(self):
requests.get('http://0.0.0.0:5000/lights/off')
def on_left_arrow_press(self):
requests.get('http://0.0.0.0:5000/lights/color-next')
def on_right_arrow_press(self):
requests.get('http://0.0.0.0:5000/lights/color-prev')
def on_up_arrow_press(self):
requests.get('http://0.0.0.0:5000/lights/brightness-up')
def on_down_arrow_press(self):
requests.get('http://0.0.0.0:5000/lights/brightness-down')
controller = MyController(interface="/dev/input/js0", connecting_using_ds4drv=False)
controller.listen(timeout=60)As you can see in the code we're telling Python when the "X" button is clicked send a request to the API which in turn sends a request to the light.
Then on your terminal open a new tab to start the Python script, navigate to the lights project and type:
python3 ps.pyOpen another tab in terminal to start Node.js server, navigate to the lights project and type:
// you only need this command if your node server isn't already running. Skip if it is
node_modules/.bin/babel-node index.js
Both the Node.js server and Python script are listening now. You're ready to use the controller.
Drum roll!!! press X, O, left, right, up, down! Play around with the lights.
Resources